Feathering My Nest has moved!... come check all of this out over at www.featheringmynest.ca/blog
Here she is!…
Introducing one sweet little beauty of a cupboard…
She was in a goopy state with the layers of many years past paint jobs… Four real thick ones to be exact… cream… pinky… greeny… and then the last glossy white… and if you know me you know that I love to paint things white and cream… BUT!… I have a problem with runs and goopy paint jobs…
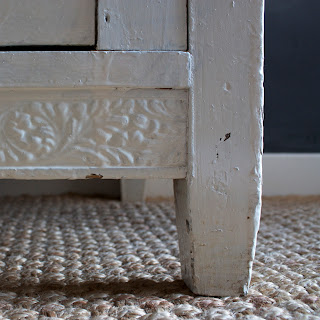
I really underestimaed the amount of prep on this piece… You know that Annie Sloane would stick to an eel so I could have just slapped the paint straight onto this as it was… BUT being that the previous paint was so thick I felt the need to strip it down to the bare wood… knowing this would produce the best results for the finished piece… this turned out to be most true in regards to the bottom front detail… once it was stripped and refinished the details just POPPED!… no longer was its beauty buried…
Before I go to far though let's back up a little and start at the beginning… this little beauty was quite a charmer even in her previous state…
She had some nice natural wear and tear but she needed some polish…
All the hardware was removed…
These little towel bars remind me of the towel bar that was in my maternal grandmother's house when I was a child… these ones were in rough shape and the request had been made to remove them for good…
Next came the stripping… I used my handy dandy Milwaukee orbital sander with a variety of grits of paper… starting of course with the rougher grits of 80 and 60 and working to a 120 and then 220 to prepare the wood for painting…
Some sanding words of advice… if you do not have a respirator then be sure to get yourself some dust masks… you do not want to be breathing in the dust… also keep a shop vac handy… it makes for easy dust cleanup!…
For fear of sanding away the detail of the bottom strip I made a trip to Home Depot and upon the advice of one of their worker bees I came home with a can of Smart Strip… an eco friendly stripping product!…
I taped off the area to be stripped and placed some plastic underneath to catch any overspray… As the layers of paint were really thick I went through the spray stripping process twice on this bottom detail piece and then got into the fine areas with a small scaper to ensure that all of the stripping product and paint was removed… finally I gave the wood a wash with water and a sponge to ensure all of the stripper was removed… it was definitly worth the time to do this twice… what beautiful results from this product!…
No I was not endorsed in any way to talk up this product… unfortunately!… hehe… it just worked really well… and if I can share that information and help someone out with a project they're working then AWESOME!…
I also gave the stipper a try on the original hinges…
I dropped them into a glass jar with some of the stripper and gave them a wash down after… they came pretty clean and with a wash they were paint free!…
On this project I went back to Chalk Paint - Annie Sloan to be exact… I really prefer the chalk paint over the milk paint… I love the thick thick paint...
Sp after the complete stripping it was time for paint… and of course I chose Annie Sloan's Old White… but this time I tried something new after… but before that!… so excited I keep getting ahead of myself… It got a good sanding so that the final finish was nice and smooth… I really love a smooth paint finish on a piece like this…
Also… I marked out all of the holes before the final finishing… some painters tape, Lacey math, and hole drilling and the hardware holes were ready…
This finish on this sweet little cupboard is completely new for me… I practiced on a test piece first... and am I ever glad that I did!…
So the new for me process on this was was using Annie Slone Dark Wax… I do not recommend putting dark wax straight onto a light painted piece!… hooooo boooy!… what worked best was to wax the whole piece with the Annie Sloane Clear Wax FIRST… once that was on I went back in with a coat of the dark wax… BUT!… I didn't use straight dart wax!… I cut the dark wax with some clear… I made a half and half mix in a small glass jar… mixed with a wooden paint stick… The glass jar is really great becuse you can make mixes… see them and store them easily!…
How have your experiences been with Dark Wax products?… do you have any learned adviced that you can share?…
Once waxed and buffed the hardware went on and voila!… she's been reloved!…
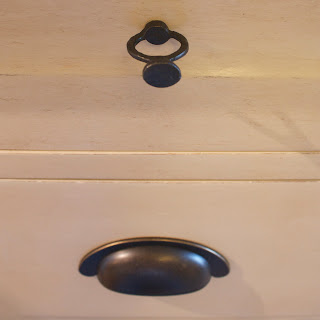
This piece came to me with the hardware chosen… and the pulls worked so beautifully with the warmth of the dark wax finish… These pulls are from Lee Valley… if you have a local Lee Valley lucky you!… if not you can order online!… they have some amazing hardware…
The rough hand hewn ring pulls chosen for the top drawer and door are quite graphic but still warm in their colouring and primitiveness…
The dark wax beautifully nestles itself into cracks, corners and ridges…
I found this 12qt stoneware bowl above on a recent treasure hunt… along with the Sunburst crock below and couldn't resisit getting them in a few shots with this darling little cupboard… they go together like milk and cookies…
Enough of my jibber jabbering… here are a few detail shots…
Now I said she was all done… again getting ahead of myself… I couldn't see this one completly refinished on the outside without some loving on the inside… the inside was also in some rough shape…
This piece has truly been loved and well used for many years… you can tell by all of the beauty marks left upon her… but a quick measure and a few cuts of some fresh thin board and BAM!… brand new drawer bottoms… much more inviting for precious things to be laid upon…
Now she is complete… and ready to go back home to Feather Katie's Nest!…
I hope you enjoy her even more now Katie!
xo
Lacey
Come check out and Like Feathering My Nest on Facebook!… www.facebook.com/FeatheringMyNest
Link Party Love Time:
C.R.A.F.T. Coastal Charm Our Delightful Home My Romantic Home Manic Monday I Should be Mopping the Floor DIY Showoff The Girl Creative Handy Man Crafty Woman Savvy Southern Style Rae Gun Ramblings {Primp} The Melrose Family Romance on a Dime Ginger Snaps and Crafts DIY by Design If It's Not Baroque The Shabby Creek Cottage House of Hepworths No Minimalists Here Crafty, Scrappy, Happy The Vintage Farmhouse Live Laugh Rowe The Shabby Nest Miss Mustard Seed French Country Cottage Redoux The DIY Showoff Project Parade ModMix Monday French Country Cottage Chic on a Shoestring Decorating Young And Crafty Shabby Art 5 Days 5 Ways Petals to Picots Remodelaholic Ivy and Elephants Create. Craft. Love: Pomp Party


